Saturday, June 11, 2011

Musical Drawings


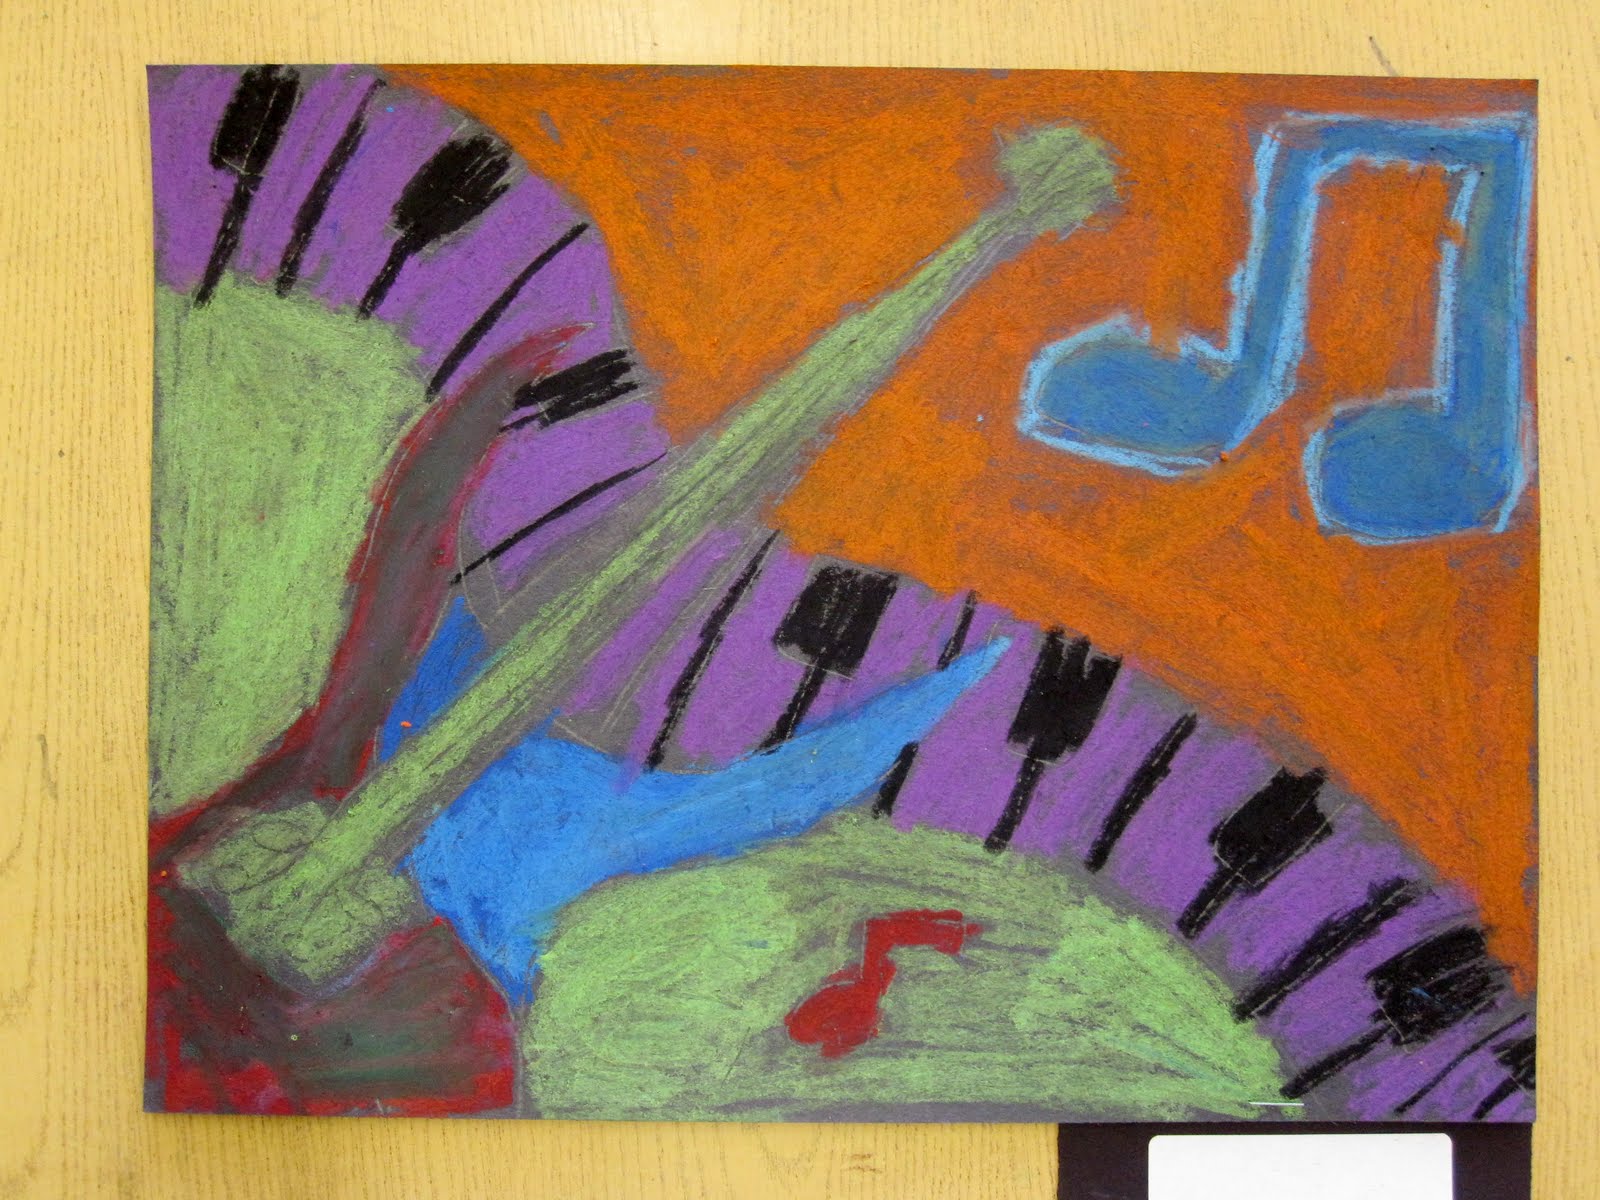
This lesson focused on the ideas of composition, balance and rhythm.  We talked about how many artists have made art works about musicians and musical instruments.  We looked at different examples and then talked about creating our composition.  Students had to include 4 items in their drawings- a keyboard, an instrument of their choice, a music note and a 4th musical object of their choice.  We drew on black paper and colored with oil pastels.  We reviewed blending oil pastels and outlined drawings with black when finished.  These were really fun, bold projects.

Recylced Book Boxes


I found the idea for this on the Dick Blick website and I had the perfect supplies thanks to the Rhode Island Recycling Center.  I had these boxes that were bright pink with gold edges.  We wanted to turn them into books that held objects instead of pages.  we drew lines around the edges to simulate pages and covered the outside of our box with torn tissue paper.  After much trial and error I found that this was the best technique to cover the designs on the box.  We then used metallic paint to decorate our boxes.  Students had the choice of painting abstract designs or images.  Next time I try this I might give them a more specific theme- some students just didn't know what to do.

Metal Tooling Mythological Creatures


We looked at different examples of mythological creatures in Eric Carle's book Dragons, Dragons.  Students drew a picture of a mythological creature that already exists or could make up their own.  We then discussed the process of metal tooling or repousse.  We made a drawing on scrap paper and then traced it onto a piece of 6x6 aluminum using a wooden stylus.  We made sure to have a piece of felt beneath our aluminum so that there would be something to press into when making our indentations.  When our relief was complete we painted over it with black india ink and immediately wiped it off with a paper towel.  This left the ink in the grooves making their drawing stand out.  The last step was to create a frame- we did this by tracing a square in the center of a 9x9 piece of black paper.  The aluminum was taped to the frame from behind.  Students could decorate the frame with oil pastels if they chose.  The students loved this project!  The results were really successful.

Hot Air Balloons


1st graders drew hot air balloons after looking at various images and discussing how they work.  We talked about how the closer hot air balloons appear larger than the hot air balloons that are further away.  We also discuseed how to draw a basket that looks three dimensional.  Students added other details in the sky, baskets and down below.  This lesson was borrowed from Mrs. Brown's website.

Frida Kahlo Inspired Self-portraits


We looked at several of Frida Kahlo's self-portraits.  We discussed how she includes backgrounds and objects that are important to her in her paintings.  Students were asked to choose their favorite place and two of their favorite things to include in their self- portraits.  We did this project in phases, first we painted our background, then we drew and colored our self-portraits with crayons and finally drew our favorite objects.  We cut and glued our self-portraits and favorite objects onto our background.

Sunday, June 5, 2011

Special Needs Students


I also came across Adventures in Art which is a fantastic blog about teaching art to students with special needs.  This teacher posts great lesson ideas and material modifications.


Interactive Art Blogs


I found this great list of interactive art blogs on Mrs. Picasso's Art Room blog.  Check it out!

Saturday, June 4, 2011

Cherry Blossom Prints


3rd graders made cherry blossom collage/prints inspired by Van Gogh's Cherry Blossom painting.  We discussed his composition- how he doesn't show the whole tree- just a section of branches and flowers.  Students started by drawing and cutting out a branch to glue on a light blue background- this surprisingly took an entire class for most students.  The next week we discussed printmaking and cut a flower shape out of sticky backed foam (thank you yet again Rhode Island Recycling Center) which we stuck onto a piece of cardboard to create our printing plate.  We also used this time to draw and cut out some birds to include on our brances.  The third week students misxed their own shades of pink and painted their printing plates which they used to stamp their flowers.  I saw a similar lesson on a blog where the flowers were also collaged.  My students really enjoyed the printmaking process!

Van Gogh Sunflowers


Kindergarteners looked at images of Van Gogh's Sunflowers.  We discussed what shapes and colors we saw.  We started by cutting out symmetrcial vases- students folded their papers in half and were instructed to draw a number 3 starting at the fold.  They cut them out and decorated them with oil pastel creating different patterns and designs.  The next class we glued brown strips to the bottom of our papers and our vases on top of that- we talked about overlapping our vase on the brown paper instead of having it sit right on top of it.  Students then traced and cut out 3 circles using whatever combination of yellow and orange they chose.  they drew dark circles in the center and cut fringes around the edges to simulate petals.  They were glued at different heights about the vase.  The next week THey painted green stems and leaves connecting the flowers to the vases.  This lesson took about 2 and a half classes- my K classes are only 30 min.  If I had longer I could have finished this in 2 classes.

Warhol Inspired Flowers


We looked at Andy Warhols flower prints and discussed how the flowers were abstract based on the colors used and how the lines and color don't exactly match up.  We then created our "backwards" painting- instead of starting with a drawing and then painting, we painted first.  Students were instructed to begin by painting different sized circles with different colors.  They then painted around the circles with green.  The next week they used black sarpie to draw their details.  We talked about several different ways to draw flowers and what other details they could add around them- grass, leaves, bugs, etc.  This lesson takes about 1 1/2 classes.  On the second day we read Lois Ehlerts' "Painting a Rainbow" which is about planting a garden of different colored flowers.

Stained Glass Bugs


We looked at different examples of stained glass and discussed how it was made.  We tried to mimic the look of it but using black paint to create thick lines to outline our drawings.  Students drew a picture on scrap paper- the theme for this lesson was bugs, students had to zoom in on a bug and foliage (plant, flower, tree, etc).  They then placed a transparency sheet over it and traced their drawing with black paint.  The next week when the paint was dry they flipped them over so the paint was on the back and colored in the different areas with a variety of colors using colored sharpies.  It is important to remind students not to use too much paint- if there is too thick an application it will peel off when dry.

Egyptian Sarcophagus

4th graders made these Egyptian Sarophagus'.  In the past 4th grade has gone on an annual field trip to the MFA where these are on view but this year the trip was cancelled due to lack of budget.  I continued with the project anyway because the students really seem to enjoy it.  I used this gold paper that I bought from the Rhode Island Recycling Center which is just about the greatest place on earth.  If you are at all near it you should check it out- businesses donate surplus supplies that are then sold to educators by the pound for super cheap.  What they have in stock always changes but you can find anything from different types of paper and fabric to binders, to various labels, stickers, plastic containers, beads- it is really incredible!  So we viewed images of sarcophagus' and discussed the process of mummification and hieroglyphics before desinging our own.  We used colored sharpies to add details. 

Marc Chagall Inspired Flying FIgures


This is a lesson I did with 2nd graders.  We looked at several of Chagall's paintings and discussed how they looked "dreamy" and what in particular made them look that way.  A common theme was flying figures.  We folded our papers in half- students were instructed to draw a town or village on the bottom half of the paper.  We drew wavy roads to make it look more dreamy and kept our details small so they would appear to be far below.  On the top half of their papers students drew a flying figure (we were going for a self-portrait) with a night time sky.  We talked about how it might be easier to turn your paper vertically to draw the figure and how to draw stars. Students chose their color of paper and used oil pastels to color.  This is a project I definitely plan of doing again- the results were really whimsical.

Cardinals


This is one of my new favorite lessons!  I found this idea on another blog and tried it out with Kindergarten this past winter.  We looked at different images of cardinals and discussed what shapes we saw.  Students began by painting a brown branch across their paper.  they then painted a circle above the branch with a triangle on top and a trapezoid (or triangle with its point cut off) below the branch.  They used white paint to add snow on top of the branch and in the sky.  The next week we added faces by cutting out and gluing on a small orange triangle beak.  They drew two dots for eyes, one on each side of the triangle.  I'll try to find a closeup. These came out really beautiful!