 In this lesson we begin by discussing what a tint is. Students choose either red or blue paint to use for their background and are given a small cup of white paint. Little by little they add their color to the white and paint in layers from bottom to top, getting darker as they go. Once the background is dry students use black paint to add silhouettes of trees showing distance by painting the tree in front larger and the tree in back smaller. Students can add any other details in silhouette- a fence, animals, person... They then use white paint to add a moon and snow falling in the sky and on tree branches. To finish off their painting they mix gray and add shadows under all their objects.
Showing posts with label Seasons: winter. Show all posts
Showing posts with label Seasons: winter. Show all posts
Sunday, March 6, 2011
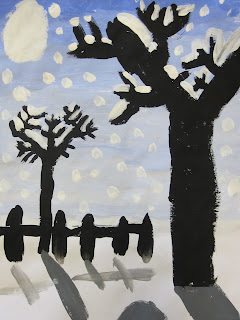
Tinted Winter Tree Silhouettes
 In this lesson we begin by discussing what a tint is. Students choose either red or blue paint to use for their background and are given a small cup of white paint. Little by little they add their color to the white and paint in layers from bottom to top, getting darker as they go. Once the background is dry students use black paint to add silhouettes of trees showing distance by painting the tree in front larger and the tree in back smaller. Students can add any other details in silhouette- a fence, animals, person... They then use white paint to add a moon and snow falling in the sky and on tree branches. To finish off their painting they mix gray and add shadows under all their objects.
Labels:
4th grade,
painting,
Seasons: winter,
shadows,
silhouette,
tint
Sunday, January 16, 2011
Winter Landscapes
,

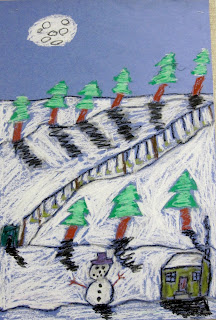
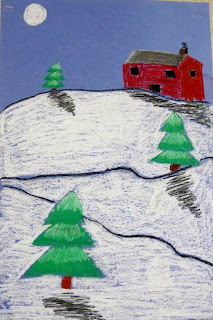
5th graders used oil pastels to create winter themed landscapes. We reviewed lots of vocabulary- landscape, horizon line, foreground, middleground, background... Students could include whatever winter elements they chose in their landscapes but each object had to have a shadow (colored in the same direction and away from the light source) and they had to make sure that they paid attention to atmospheric perspective- objects in the distance are smaller than objects that are closer. These came out great but we blew through white oil pastels!


5th graders used oil pastels to create winter themed landscapes. We reviewed lots of vocabulary- landscape, horizon line, foreground, middleground, background... Students could include whatever winter elements they chose in their landscapes but each object had to have a shadow (colored in the same direction and away from the light source) and they had to make sure that they paid attention to atmospheric perspective- objects in the distance are smaller than objects that are closer. These came out great but we blew through white oil pastels!
Labels:
5th grade,
drawing,
landscape,
oil pastel,
Seasons: winter
Seasonal Symbols


I came across this idea on Artprojectsforkids.org. We began by discussing what a symbol is- an image that represents an idea. We brainstormed a list of winter symbols before students began by asymmetrically dividing their papers. They drew one winter symbol in each box, colored with crayon and painted the backgrounds.
Wednesday, January 12, 2011
Snow Globes
Sunday, June 6, 2010
Winter Birch Trees
Students begin by painting the background using wet on wet watercolor techniques to create a sky and snowy ground. Once the background is dry, students used markers to add details such as fences, animaks, footprints, etc. They then cut and glued white strips of paper which they used sharpie to draw small black lines. They then added shadows by using a very light grey paint on the dies of the tress, under the trees and any other details they added. We talked about where the light source comes from and how all of the shadows should be on the same side.


Subscribe to:
Posts (Atom)


