Showing posts with label painting. Show all posts
Showing posts with label painting. Show all posts
Saturday, June 4, 2011
Warhol Inspired Flowers
We looked at Andy Warhols flower prints and discussed how the flowers were abstract based on the colors used and how the lines and color don't exactly match up. We then created our "backwards" painting- instead of starting with a drawing and then painting, we painted first. Students were instructed to begin by painting different sized circles with different colors. They then painted around the circles with green. The next week they used black sarpie to draw their details. We talked about several different ways to draw flowers and what other details they could add around them- grass, leaves, bugs, etc. This lesson takes about 1 1/2 classes. On the second day we read Lois Ehlerts' "Painting a Rainbow" which is about planting a garden of different colored flowers.
Labels:
1st grade,
Artist: Warhol,
painting,
Seasons: spring
Cardinals
This is one of my new favorite lessons! I found this idea on another blog and tried it out with Kindergarten this past winter. We looked at different images of cardinals and discussed what shapes we saw. Students began by painting a brown branch across their paper. they then painted a circle above the branch with a triangle on top and a trapezoid (or triangle with its point cut off) below the branch. They used white paint to add snow on top of the branch and in the sky. The next week we added faces by cutting out and gluing on a small orange triangle beak. They drew two dots for eyes, one on each side of the triangle. I'll try to find a closeup. These came out really beautiful!
Tuesday, May 24, 2011
Warm and Cool Colored Umbrellas
April showers bring May flowers! Kindergarteners painted umbrellas with warm colors and raind drops with cool colors. They traced the shape of the umbrellas from patterns, cut them out and glued everything together. They were encouraged to create unique designs and patterns.
Monday, May 23, 2011
Value Shelves
Prior to this lesson we did some value exercises. We folded our paper into four squares. We traced a smaller square of card board in the corner of each square and connected them with diagonal lines. We mixed different shades of gray by adding little dabs of black to small cups of white paint. We started with a light gray on the bottom of the shelf then added more black to mix a medium gray for the side and mixed a darker gray for the back of the shelf. While the shelves were drying students drew and colored objects to cut and glue onto them. Students were asked to think about the size or proportion of the object to the shelf.
Updated Thiebaud
Here is a different version of a Wayne Thiebaud project. We specifically looked at his cakes and discussed what types of 3D shapes we saw (cylinder, triangular prism...) as well as his straightforward compositions- rows with shadows and a blank background. I showed students how to draw a 3D cake slice and a 3D cake with a slice missing. I showed them step by step (and provided some oval tracers) and then supplied them with the same instrucions written/drawn out as a reminder. They did a great job with these! We used oil pasted to draw details and painted in the larger areas with tempera cakes.
Sunday, March 6, 2011
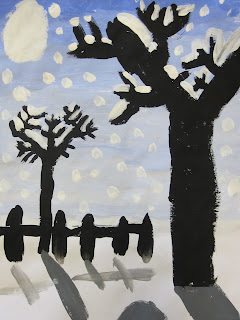
Tinted Winter Tree Silhouettes
 In this lesson we begin by discussing what a tint is. Students choose either red or blue paint to use for their background and are given a small cup of white paint. Little by little they add their color to the white and paint in layers from bottom to top, getting darker as they go. Once the background is dry students use black paint to add silhouettes of trees showing distance by painting the tree in front larger and the tree in back smaller. Students can add any other details in silhouette- a fence, animals, person... They then use white paint to add a moon and snow falling in the sky and on tree branches. To finish off their painting they mix gray and add shadows under all their objects.
Labels:
4th grade,
painting,
Seasons: winter,
shadows,
silhouette,
tint
Legend of the Indian Paint Brush


We read The Legend of the Indian Paint Brush by Tomie DePaola. We brainstormed different images that we saw in Little Gopher's paintings. We began by painting a 12x18 piece of paper in a rainbow pattern of stripes. When that was dry we drew scalloped lines around the edges and cut them out to make it look more like the animal skins we saw in the story. Students then used oil pastels to draw Native American scenes.
Labels:
1st grade,
Native American,
oil pastel,
painting,
Seasons: fall
Wednesday, January 12, 2011
Roy Lichtenstein Inspired Self-portraits

We began by looking at Roy Lichtenstein's comic paintings. We discussed his techniques such as using primary colors and ben-day dots. After reviewing facial proportions and how to draw features students drew a self portrait. They included a speech or a thought bubble with a work or phrase that was important to them. Drawings were painted with primary colors and one area had to be filled in with ben-day dots. The results were very graphically strong.
Labels:
5th grade,
Artist: Lichtenstein,
painting,
Pop Art,
primary colors,
self-portrait
Sunday, June 6, 2010
Winter Birch Trees
Students begin by painting the background using wet on wet watercolor techniques to create a sky and snowy ground. Once the background is dry, students used markers to add details such as fences, animaks, footprints, etc. They then cut and glued white strips of paper which they used sharpie to draw small black lines. They then added shadows by using a very light grey paint on the dies of the tress, under the trees and any other details they added. We talked about where the light source comes from and how all of the shadows should be on the same side.


Chinese Scrolls
We looked at reproductions of Chinese scroll paintings and discussed their consistent theme of nature. We noticed that there were often mountains, trees, bodies of water and clouds depicted in these paintings. Students drew a landscape using these elements. They added detail with oil pastel before painting with tempra cakes.


Starry Night
Wayne Thiebaud Inspired Paintings
Students were introduced to the paintings of Wayne Thiebaud. Thiebaud's (pronounced Tee-bo) paintings depict realistically painted desserts and sweets. We looked at paintings of cakes, ice cream, lollipops and gumball machines before brainstorming other treats. Students drew multiple desserts and added details using oil pastels. They then painted them using tempera cakes.
Sunday, May 9, 2010
Cityscapes
I think this might be my new favorite project. I did it with 4th graders but you could really do it with any grade. Students start by painting different sized squares and rectangles to represent buildings. Start your buildings about 1/4 from the bottom of your paper (leave space for a sidewalk or road to add more city details). After a row of brighlty colored shapes is complete use a dark blue to create a skyline silhouette behind them. Use a lighter blue to pain the sky. Once paint is dry students us sharpie to add details to buildings. We discussed different types of building facades, materials, roofs, doors, windows and what might be happening on the street.
Saturday, May 8, 2010
Warm/Cool Sunsets
Students review warm and cool colors. Demonstrate how to draw a sunset- start with a wavy horizon line, draw a half circle above it with radiating diagonal lines. Students paint sunset using warm colors for the sky and cool colors for the water. Students practice blending colors and gradation. Students can use black sharpie to add silhouetted details (birds, marine life, boats...).
Labels:
3rd grade,
painting,
silhouette,
warm and cool colors
Subscribe to:
Posts (Atom)


