Showing posts with label self-portrait. Show all posts
Showing posts with label self-portrait. Show all posts
Tuesday, May 8, 2012
Me and My Shadow
1st graders drew self-portraits with shadows. We began by reading Dr. Seuss' The Shape of Me. We talked about what a silhouette was and how it looks like a shadow. Students were given a long narrow piece of paper with a lightly photocopied person image on the top half. The folded the paper in half so that the persons feet were touching the fold. They then decorated their person to look like themselves using marker. The next step was to cut them out keeping the paper folded in half. When they opened it up they had a mirror reflection of their self-portrait which they colored black with a crayon. They really enjoyed this project and couldn't wait to take them home!
Labels:
1st grade,
Artist: Dr. Seuss,
self-portrait,
shadows,
silhouette
Saturday, June 11, 2011
Frida Kahlo Inspired Self-portraits
We looked at several of Frida Kahlo's self-portraits. We discussed how she includes backgrounds and objects that are important to her in her paintings. Students were asked to choose their favorite place and two of their favorite things to include in their self- portraits. We did this project in phases, first we painted our background, then we drew and colored our self-portraits with crayons and finally drew our favorite objects. We cut and glued our self-portraits and favorite objects onto our background.
Saturday, June 4, 2011
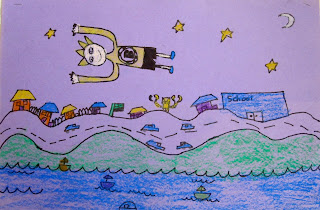
Marc Chagall Inspired Flying FIgures
This is a lesson I did with 2nd graders. We looked at several of Chagall's paintings and discussed how they looked "dreamy" and what in particular made them look that way. A common theme was flying figures. We folded our papers in half- students were instructed to draw a town or village on the bottom half of the paper. We drew wavy roads to make it look more dreamy and kept our details small so they would appear to be far below. On the top half of their papers students drew a flying figure (we were going for a self-portrait) with a night time sky. We talked about how it might be easier to turn your paper vertically to draw the figure and how to draw stars. Students chose their color of paper and used oil pastels to color. This is a project I definitely plan of doing again- the results were really whimsical.
Labels:
2nd grade,
Artist: Chagal,
oil pastel,
self-portrait
Tuesday, May 24, 2011
Me and My Shadow
First graders made self-portraits including their shadows. We started by reading Dr. Seuss's "The Shape of Me". They were given a 6 x 18" piece of paper that they folded in half. I gave them a generic person shape to trace with the feet touching the fold of the paper. Then we talked about how to draw different facial features and details to make a drawing that looked like them. Once their self-portrait was drawn and colored students cut out their people keeping the paper folded. They then opened their paper and colored their shadows black. The kids really enjoyed this lesson.
Wednesday, January 12, 2011
Roy Lichtenstein Inspired Self-portraits

We began by looking at Roy Lichtenstein's comic paintings. We discussed his techniques such as using primary colors and ben-day dots. After reviewing facial proportions and how to draw features students drew a self portrait. They included a speech or a thought bubble with a work or phrase that was important to them. Drawings were painted with primary colors and one area had to be filled in with ben-day dots. The results were very graphically strong.
Labels:
5th grade,
Artist: Lichtenstein,
painting,
Pop Art,
primary colors,
self-portrait
Reflective Self-Portraits
 For this self-portrait, students drew themselves from the front and back. They began by tracing a circle template on one side of their paper. In that circle they drew a self-portrait after reviewing proportions and how to draw facial features. Next to the circle they drew themselves from behind with an outstretched arm holding the mirror. In the background they were to draw a room setting paying attention to size to make objects appear to be off in the distance. We reviewed colored pencil techniques such as blending before they colored in their art work. In the future I might consider using crayons instead- the colored pencils took a very long time for this project- they would work better with a smaller sized paper.
Sunday, December 19, 2010
Modigliani Style Self-portraits


After learning how to do a self-portrait using proper proportions, 3rd grade students are introduced to the work of Amedeo Modigliani. I originally saw this project on www.artprojectsforkids.org where I borrow many of my ideas from. Students began by folding their paper in half vertically to get a fold right down the center. They then folded their paper horizontally in half, also folding the top half down to the center fold and the lower half up to the center fold creating 8 rectangles. These folds were used as guidlines. We looked at the works of Modigliani and discussed the proportions he used and why. They drew a narrow oval along the center fold in the top half of the paper, the neck was drawn in the next section and the upper body in the last section. After adding facial features and hair, drawings were traced with black oil pastel (these are done on black construction paper). We reviewed how to use oil pastels and how to blend them to create new colors. Students had to blend colors to create skin tone and hair color. The oil pastels on the black paper made the colors very vibrant.
Labels:
3rd grade,
Artist: Modigliani,
drawing,
oil pastel,
self-portrait
Paul Klee Inspired Self-portrait

Next we moved onto self portraits. 1st graders looked at the work of Paul Klee and created a drawing based on lessons I found on several different websites. I gave them an oval template to trace for the shape of their head. We discussed the proper proportions to use when drawing a portrait and how to draw facial features. Students drew themselves and outlined in sharpie. The next class we began adding tissue paper by wetting our drawing, placing a square of tissue paper down and adding water on top of that. They filled up their drawing with rows of colored tissue paper making sure to use plenty of water. When dry, the tissue paper easily peeled off leaving a stain from the color behind. This was a very easy fun process that the kids enjoyed.
Labels:
1st grade,
Artist: Klee,
self-portrait,
tissue paper
Saturday, May 8, 2010
Picasso Inspired Portraits
Students look at and discuss Picasso's abstract portraits where multiple views are shown simultaneously. Demonstrate a frontal portrait and profile view. Incorporate Picasso's use of color and line.
Subscribe to:
Posts (Atom)


